

 Bahasa Indonesia
 Deutsch
 English
 Español
 Français
 Português (Brasil)
 Türkçe
 ไทย
 中文(简体)
 中文(繁體)
 한국어
迷路を進む
このチュートリアルでは、完全なプログラムを一歩ずつ作っていきます。ロボットは壁や穴を避けながら迷路を走り回り、壁のトークンらしきものを見つけたら報告します。これは初めての実行で動かしたプログラムです。
スターターロボットと、移動とセンサーで学んだことを使います。
world1.wbt で実行しましょう。このワールドは次のようになっています。
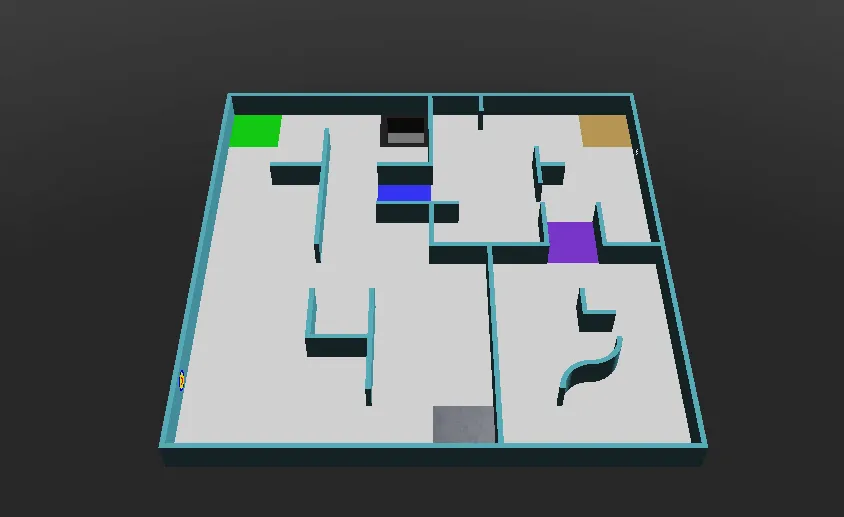
まず、プログラムはロボットを作成し、車輪のモーターを取得して、制限なく回るようにします。speeds は各車輪の速度を保持し、プログラムの残りの部分がこれを変更します。reported は、ロボットがすでにトークンを報告した場所を記憶します。
from controller import Robotimport structimport numpy as npimport cv2 as cv
robot = Robot()timeStep = 32         # Milliseconds between stepsmaxVelocity = 6.28    # The maximum speed of the wheels, in radians per second
leftWheel = robot.getDevice("left wheel motor")rightWheel = robot.getDevice("right wheel motor")leftWheel.setPosition(float("inf"))   # Let the wheels turn without limitrightWheel.setPosition(float("inf"))
speeds = [maxVelocity, maxVelocity]   # [left wheel speed, right wheel speed]reported = []                         # Positions where a token has already been reported
#include <array>#include <cmath>#include <cstring>#include <vector>#include <opencv2/opencv.hpp>#include <webots/Robot.hpp>#include <webots/Motor.hpp>#include <webots/DistanceSensor.hpp>#include <webots/Camera.hpp>#include <webots/Emitter.hpp>#include <webots/GPS.hpp>
using namespace webots;using namespace std;
Robot *robot = new Robot();const int timeStep = 32; // Milliseconds between stepsconst double maxVelocity = 6.28; // The maximum speed of the wheels, in radians per second
Motor *leftWheel = robot->getMotor("left wheel motor");Motor *rightWheel = robot->getMotor("right wheel motor");
double speeds[2] = {maxVelocity, maxVelocity}; // {left wheel speed, right wheel speed}vector<array<int, 2>> reported; // Positions where a token has already been reported2. センサー
Section titled “2. センサー”次に、スターターロボットのセンサーを取得して有効にします。
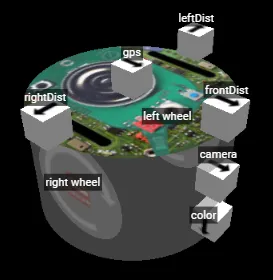
leftDist = robot.getDevice("leftDist")frontDist = robot.getDevice("frontDist")rightDist = robot.getDevice("rightDist")camera = robot.getDevice("camera")colorSensor = robot.getDevice("color")gps = robot.getDevice("gps")emitter = robot.getDevice("emitter")  # The emitter does not need to be enabled
for sensor in [leftDist, frontDist, rightDist, camera, colorSensor, gps]:    sensor.enable(timeStep)
DistanceSensor *leftDist = robot->getDistanceSensor("leftDist");DistanceSensor *frontDist = robot->getDistanceSensor("frontDist");DistanceSensor *rightDist = robot->getDistanceSensor("rightDist");Camera *camera = robot->getCamera("camera");Camera *colorSensor = robot->getCamera("color");GPS *gps = robot->getGPS("gps");Emitter *emitter = robot->getEmitter("emitter"); // The emitter does not need to be enabled
void enableSensors() { leftDist->enable(timeStep); frontDist->enable(timeStep); rightDist->enable(timeStep); camera->enable(timeStep); colorSensor->enable(timeStep); gps->enable(timeStep);}これらの関数は、速度を変えて曲がったりその場で回転したりします。delay は、指定したミリ秒のあいだロボットに同じ動作を続けさせ、getBrightness はカラーセンサーを 0(黒)から 255(白)までの 1 つの値として読み取ります。
def turnRight():    speeds[0] = 0.6 * maxVelocity    speeds[1] = -0.2 * maxVelocity
def turnLeft():    speeds[0] = -0.2 * maxVelocity    speeds[1] = 0.6 * maxVelocity
def spin():    speeds[0] = 0.6 * maxVelocity    speeds[1] = -0.6 * maxVelocity
def delay(ms):    start = robot.getTime()    while robot.step(timeStep) != -1:        if (robot.getTime() - start) * 1000 > ms:            break
def getBrightness():    image = colorSensor.getImage()    return colorSensor.imageGetGray(image, colorSensor.getWidth(), 0, 0)  # 0 (black) to 255 (white)
void turnRight() { speeds[0] = 0.6 * maxVelocity; speeds[1] = -0.2 * maxVelocity;}
void turnLeft() { speeds[0] = -0.2 * maxVelocity; speeds[1] = 0.6 * maxVelocity;}
void spin() { speeds[0] = 0.6 * maxVelocity; speeds[1] = -0.6 * maxVelocity;}
void delay(int ms) { double start = robot->getTime(); while (robot->step(timeStep) != -1) { if ((robot->getTime() - start) * 1000 > ms) break; }}
int getBrightness() { const unsigned char *image = colorSensor->getImage(); return Camera::imageGetGray(image, colorSensor->getWidth(), 0, 0); // 0 (black) to 255 (white)}4. トークンを見つける
Section titled “4. トークンを見つける”この関数は、カメラ画像の中から壁のトークンを探します。トークンは暗い壁の上の明るい四角形なので、ほぼ正方形で、画像の端(ふつうは床が写る部分)に接していない明るい形を探します。
def seesToken(image): height, width = camera.getHeight(), camera.getWidth() image = np.frombuffer(image, np.uint8).reshape((height, width, 4)) # BGRA image for OpenCV gray = cv.cvtColor(image, cv.COLOR_BGRA2GRAY) _, bright = cv.threshold(gray, 200, 255, cv.THRESH_BINARY) # Bright parts in white contours, _ = cv.findContours(bright, cv.RETR_EXTERNAL, cv.CHAIN_APPROX_SIMPLE) for contour in contours: x, y, w, h = cv.boundingRect(contour) if x == 0 or y == 0 or x + w == width or y + h == height: continue # Shapes touching the edge of the image are usually the floor if cv.contourArea(contour) > 40 and 0.65 < w / h < 1.5: return True # A bright, roughly square shape on a wall return Falsebool seesToken(const unsigned char *image) { int height = camera->getHeight(), width = camera->getWidth(); cv::Mat frame(height, width, CV_8UC4, (void *)image); // BGRA image for OpenCV cv::Mat gray, bright; cv::cvtColor(frame, gray, cv::COLOR_BGRA2GRAY); cv::threshold(gray, bright, 200, 255, cv::THRESH_BINARY); // Bright parts in white vector<vector<cv::Point>> contours; cv::findContours(bright, contours, cv::RETR_EXTERNAL, cv::CHAIN_APPROX_SIMPLE); for (const auto &contour : contours) { cv::Rect box = cv::boundingRect(contour); if (box.x == 0 || box.y == 0 || box.x + box.width == width || box.y + box.height == height) continue; // Shapes touching the edge of the image are usually the floor double ratio = (double)box.width / box.height; if (cv::contourArea(contour) > 40 && ratio > 0.65 && ratio < 1.5) return true; // A bright, roughly square shape on a wall } return false;}これは簡単な出発点です。記号を見分けることはできず、コグニティブターゲットもうまく見えません。壁のトークンのチュートリアルで、よりよい方法を紹介しています。
5. 報告する
Section titled “5. 報告する”トークンで得点するには、ロボットは 1 秒より長く停止してから、位置とトークンの種類を送る必要があります。各トークンで得点できるのは 1 回だけで、もう一度報告すると 5 点の減点になるので、プログラムは報告した場所を記憶します。これらのメッセージは通信で説明しています。
def report(tokenType):    leftWheel.setVelocity(0)  # Stop for more than 1 second    rightWheel.setVelocity(0)    delay(1300)    x = int(gps.getValues()[0] * 100)  # Meters to centimeters    z = int(gps.getValues()[2] * 100)    emitter.send(struct.pack("i i c", x, z, tokenType.encode()))    robot.step(timeStep)    reported.append((x, z))
def alreadyReported():    # Reporting the same token again is a misidentification    x = gps.getValues()[0] * 100    z = gps.getValues()[2] * 100    return any(abs(x - rx) < 12 and abs(z - rz) < 12 for rx, rz in reported)  # Closer than 1 tile
void report(char tokenType) { leftWheel->setVelocity(0); // Stop for more than 1 second rightWheel->setVelocity(0); delay(1300); int x = (int)(gps->getValues()[0] * 100); // Meters to centimeters int z = (int)(gps->getValues()[2] * 100); char message[9]; memcpy(&message[0], &x, 4); memcpy(&message[4], &z, 4); message[8] = tokenType; emitter->send(message, 9); robot->step(timeStep); reported.push_back({x, z});}
bool alreadyReported() { // Reporting the same token again is a misidentification double x = gps->getValues()[0] * 100, z = gps->getValues()[2] * 100; for (const auto &position : reported) if (fabs(x - position[0]) < 12 && fabs(z - position[1]) < 12) // Closer than 1 tile return true; return false;}6. メインループ
Section titled “6. メインループ”最後に、メインループですべてを組み合わせます。各ステップで、全速力で走り始め、壁から離れるように曲がり、穴からは引き返し、正面の壁に近づいたらカメラに見えたものを報告します。
while robot.step(timeStep) != -1:    speeds[0] = maxVelocity    speeds[1] = maxVelocity
    if leftDist.getValue() < 0.05:   # Wall on the left: turn right        turnRight()    if rightDist.getValue() < 0.05:  # Wall on the right: turn left        turnLeft()    if frontDist.getValue() < 0.05:  # Wall in front: spin        spin()
    if getBrightness() < 80:         # Black floor: turn away from the hole        spin()        leftWheel.setVelocity(speeds[0])        rightWheel.setVelocity(speeds[1])        delay(600)
    # Close to a wall, and something on it: report it    if frontDist.getValue() < 0.07 and not alreadyReported() and seesToken(camera.getImage()):        report("H")  # The type cannot be told yet, so guess "H"
    leftWheel.setVelocity(speeds[0])    rightWheel.setVelocity(speeds[1])
int main() { enableSensors(); leftWheel->setPosition(INFINITY); // Let the wheels turn without limit rightWheel->setPosition(INFINITY);
while (robot->step(timeStep) != -1) { speeds[0] = maxVelocity; speeds[1] = maxVelocity;
if (leftDist->getValue() < 0.05) // Wall on the left: turn right turnRight(); if (rightDist->getValue() < 0.05) // Wall on the right: turn left turnLeft(); if (frontDist->getValue() < 0.05) // Wall in front: spin spin();
if (getBrightness() < 80) { // Black floor: turn away from the hole spin(); leftWheel->setVelocity(speeds[0]); rightWheel->setVelocity(speeds[1]); delay(600); }
// Close to a wall, and something on it: report it if (frontDist->getValue() < 0.07 && !alreadyReported() && seesToken(camera->getImage())) report('H'); // The type cannot be told yet, so guess 'H'
leftWheel->setVelocity(speeds[0]); rightWheel->setVelocity(speeds[1]); }
delete robot; return 0;}どのくらいうまく動きますか?
Section titled “どのくらいうまく動きますか?”このロボットはあてもなく走り回ります。どこを通ったかを覚えておらず、すべての被災者の種類を推測で決めています。ときどき動けなくなり、20 秒後にゲームによってチェックポイントに戻されます。最初のプログラムとしてはこれで十分です。
試してみよう
Section titled “試してみよう”- 自分のロボットに最適な速度と距離を見つけましょう。
- 片側の壁に沿って進んでみましょう。横のセンサーの距離を一定に保ち、前のセンサーが壁を見つけたら曲がります。
- 壁までの近さに応じて速度を変えてみましょう。
次は、通信で得点のしかたを学びましょう。

Erebus は RoboCupJunior Rescue の一部です。
ニュース・イベント・チーム資料: RCJ Rescue コミュニティサイト
© 2020–2026 Erebus Development Team