

 Bahasa Indonesia
 Deutsch
 English
 Français
 Português (Brasil)
 Türkçe
 ไทย
 中文(简体)
 中文(繁體)
 日本語
 한국어
Recorre el laberinto
En este tutorial construyes un programa completo, paso a paso. El robot recorre el laberinto evitando paredes y agujeros, e informa de todo lo que parece una marca en la pared. Es el programa que ejecutaste en Tu primera ejecución.
Usa el robot inicial y lo que aprendiste en Movimiento y Sensores.
El programa completo: maze.py · maze.cpp
El campo
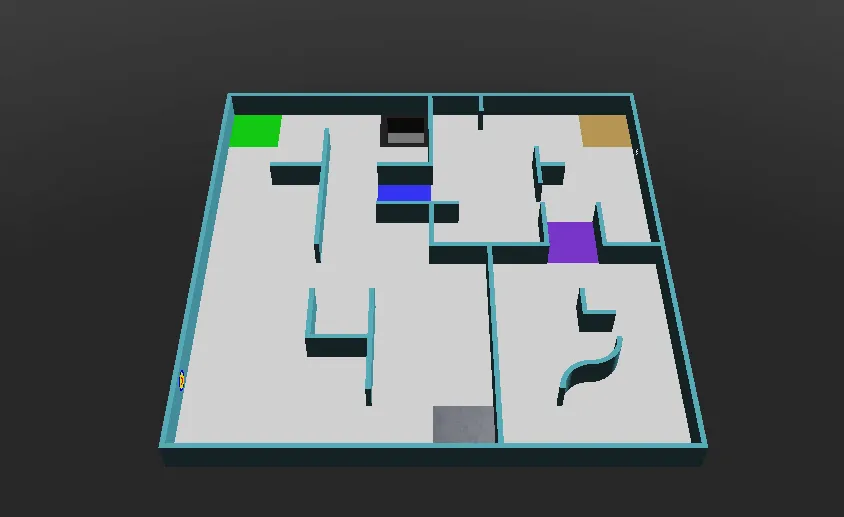
Sección titulada «El campo»Ejecútalo en world1.wbt, que tiene este aspecto:
Paso a paso
Sección titulada «Paso a paso»1. Preparación
Sección titulada «1. Preparación»Primero, el programa crea el robot, obtiene los motores de las ruedas y les permite girar sin límite. speeds guarda la velocidad de cada rueda, que el resto del programa va cambiando. reported recuerda dónde ha informado ya el robot de una marca.
from controller import Robotimport structimport numpy as npimport cv2 as cv
robot = Robot()timeStep = 32         # Milliseconds between stepsmaxVelocity = 6.28    # The maximum speed of the wheels, in radians per second
leftWheel = robot.getDevice("left wheel motor")rightWheel = robot.getDevice("right wheel motor")leftWheel.setPosition(float("inf"))   # Let the wheels turn without limitrightWheel.setPosition(float("inf"))
speeds = [maxVelocity, maxVelocity]   # [left wheel speed, right wheel speed]reported = []                         # Positions where a token has already been reported
#include <array>#include <cmath>#include <cstring>#include <vector>#include <opencv2/opencv.hpp>#include <webots/Robot.hpp>#include <webots/Motor.hpp>#include <webots/DistanceSensor.hpp>#include <webots/Camera.hpp>#include <webots/Emitter.hpp>#include <webots/GPS.hpp>
using namespace webots;using namespace std;
Robot *robot = new Robot();const int timeStep = 32; // Milliseconds between stepsconst double maxVelocity = 6.28; // The maximum speed of the wheels, in radians per second
Motor *leftWheel = robot->getMotor("left wheel motor");Motor *rightWheel = robot->getMotor("right wheel motor");
double speeds[2] = {maxVelocity, maxVelocity}; // {left wheel speed, right wheel speed}vector<array<int, 2>> reported; // Positions where a token has already been reported2. Sensores
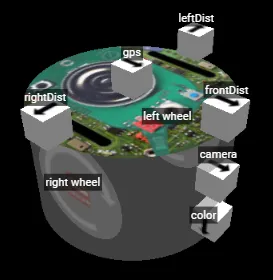
Sección titulada «2. Sensores»Después, obtiene y activa los sensores del robot inicial:
leftDist = robot.getDevice("leftDist")frontDist = robot.getDevice("frontDist")rightDist = robot.getDevice("rightDist")camera = robot.getDevice("camera")colorSensor = robot.getDevice("color")gps = robot.getDevice("gps")emitter = robot.getDevice("emitter")  # The emitter does not need to be enabled
for sensor in [leftDist, frontDist, rightDist, camera, colorSensor, gps]:    sensor.enable(timeStep)
DistanceSensor *leftDist = robot->getDistanceSensor("leftDist");DistanceSensor *frontDist = robot->getDistanceSensor("frontDist");DistanceSensor *rightDist = robot->getDistanceSensor("rightDist");Camera *camera = robot->getCamera("camera");Camera *colorSensor = robot->getCamera("color");GPS *gps = robot->getGPS("gps");Emitter *emitter = robot->getEmitter("emitter"); // The emitter does not need to be enabled
void enableSensors() { leftDist->enable(timeStep); frontDist->enable(timeStep); rightDist->enable(timeStep); camera->enable(timeStep); colorSensor->enable(timeStep); gps->enable(timeStep);}3. Movimientos
Sección titulada «3. Movimientos»Estas funciones cambian las velocidades para girar en curva o sobre sí mismo. delay hace que el robot siga haciendo lo mismo durante un número determinado de milisegundos, y getBrightness lee el sensor de color como un único valor de 0 (negro) a 255 (blanco).
def turnRight():    speeds[0] = 0.6 * maxVelocity    speeds[1] = -0.2 * maxVelocity
def turnLeft():    speeds[0] = -0.2 * maxVelocity    speeds[1] = 0.6 * maxVelocity
def spin():    speeds[0] = 0.6 * maxVelocity    speeds[1] = -0.6 * maxVelocity
def delay(ms):    start = robot.getTime()    while robot.step(timeStep) != -1:        if (robot.getTime() - start) * 1000 > ms:            break
def getBrightness():    image = colorSensor.getImage()    return colorSensor.imageGetGray(image, colorSensor.getWidth(), 0, 0)  # 0 (black) to 255 (white)
void turnRight() { speeds[0] = 0.6 * maxVelocity; speeds[1] = -0.2 * maxVelocity;}
void turnLeft() { speeds[0] = -0.2 * maxVelocity; speeds[1] = 0.6 * maxVelocity;}
void spin() { speeds[0] = 0.6 * maxVelocity; speeds[1] = -0.6 * maxVelocity;}
void delay(int ms) { double start = robot->getTime(); while (robot->step(timeStep) != -1) { if ((robot->getTime() - start) * 1000 > ms) break; }}
int getBrightness() { const unsigned char *image = colorSensor->getImage(); return Camera::imageGetGray(image, colorSensor->getWidth(), 0, 0); // 0 (black) to 255 (white)}4. Ver una marca
Sección titulada «4. Ver una marca»Esta función busca marcas en las paredes en una imagen de la cámara. Las marcas son cuadrados brillantes sobre paredes oscuras, así que busca formas brillantes que sean más o menos cuadradas y que no toquen el borde de la imagen, donde suele estar el suelo.
def seesToken(image): height, width = camera.getHeight(), camera.getWidth() image = np.frombuffer(image, np.uint8).reshape((height, width, 4)) # BGRA image for OpenCV gray = cv.cvtColor(image, cv.COLOR_BGRA2GRAY) _, bright = cv.threshold(gray, 200, 255, cv.THRESH_BINARY) # Bright parts in white contours, _ = cv.findContours(bright, cv.RETR_EXTERNAL, cv.CHAIN_APPROX_SIMPLE) for contour in contours: x, y, w, h = cv.boundingRect(contour) if x == 0 or y == 0 or x + w == width or y + h == height: continue # Shapes touching the edge of the image are usually the floor if cv.contourArea(contour) > 40 and 0.65 < w / h < 1.5: return True # A bright, roughly square shape on a wall return Falsebool seesToken(const unsigned char *image) { int height = camera->getHeight(), width = camera->getWidth(); cv::Mat frame(height, width, CV_8UC4, (void *)image); // BGRA image for OpenCV cv::Mat gray, bright; cv::cvtColor(frame, gray, cv::COLOR_BGRA2GRAY); cv::threshold(gray, bright, 200, 255, cv::THRESH_BINARY); // Bright parts in white vector<vector<cv::Point>> contours; cv::findContours(bright, contours, cv::RETR_EXTERNAL, cv::CHAIN_APPROX_SIMPLE); for (const auto &contour : contours) { cv::Rect box = cv::boundingRect(contour); if (box.x == 0 || box.y == 0 || box.x + box.width == width || box.y + box.height == height) continue; // Shapes touching the edge of the image are usually the floor double ratio = (double)box.width / box.height; if (cv::contourArea(contour) > 40 && ratio > 0.65 && ratio < 1.5) return true; // A bright, roughly square shape on a wall } return false;}Es un comienzo sencillo: no distingue los símbolos y no ve bien los objetivos cognitivos. El tutorial de Marcas en las paredes muestra cómo hacerlo mejor.
5. Informar
Sección titulada «5. Informar»Para puntuar una marca, el robot debe detenerse más de 1 segundo y enviar su posición y el tipo de la marca. Cada marca solo se puede puntuar una vez, y volver a informar de ella cuesta 5 puntos, así que el programa recuerda dónde ha informado. Comunicación explica estos mensajes.
def report(tokenType):    leftWheel.setVelocity(0)  # Stop for more than 1 second    rightWheel.setVelocity(0)    delay(1300)    x = int(gps.getValues()[0] * 100)  # Meters to centimeters    z = int(gps.getValues()[2] * 100)    emitter.send(struct.pack("i i c", x, z, tokenType.encode()))    robot.step(timeStep)    reported.append((x, z))
def alreadyReported():    # Reporting the same token again is a misidentification    x = gps.getValues()[0] * 100    z = gps.getValues()[2] * 100    return any(abs(x - rx) < 12 and abs(z - rz) < 12 for rx, rz in reported)  # Closer than 1 tile
void report(char tokenType) { leftWheel->setVelocity(0); // Stop for more than 1 second rightWheel->setVelocity(0); delay(1300); int x = (int)(gps->getValues()[0] * 100); // Meters to centimeters int z = (int)(gps->getValues()[2] * 100); char message[9]; memcpy(&message[0], &x, 4); memcpy(&message[4], &z, 4); message[8] = tokenType; emitter->send(message, 9); robot->step(timeStep); reported.push_back({x, z});}
bool alreadyReported() { // Reporting the same token again is a misidentification double x = gps->getValues()[0] * 100, z = gps->getValues()[2] * 100; for (const auto &position : reported) if (fabs(x - position[0]) < 12 && fabs(z - position[1]) < 12) // Closer than 1 tile return true; return false;}6. El bucle principal
Sección titulada «6. El bucle principal»Por último, el bucle principal lo junta todo. En cada paso, arranca a toda velocidad, se aparta de las paredes, se da la vuelta ante los agujeros e informa de lo que ve la cámara cuando tiene una pared cerca, delante.
while robot.step(timeStep) != -1:    speeds[0] = maxVelocity    speeds[1] = maxVelocity
    if leftDist.getValue() < 0.05:   # Wall on the left: turn right        turnRight()    if rightDist.getValue() < 0.05:  # Wall on the right: turn left        turnLeft()    if frontDist.getValue() < 0.05:  # Wall in front: spin        spin()
    if getBrightness() < 80:         # Black floor: turn away from the hole        spin()        leftWheel.setVelocity(speeds[0])        rightWheel.setVelocity(speeds[1])        delay(600)
    # Close to a wall, and something on it: report it    if frontDist.getValue() < 0.07 and not alreadyReported() and seesToken(camera.getImage()):        report("H")  # The type cannot be told yet, so guess "H"
    leftWheel.setVelocity(speeds[0])    rightWheel.setVelocity(speeds[1])
int main() { enableSensors(); leftWheel->setPosition(INFINITY); // Let the wheels turn without limit rightWheel->setPosition(INFINITY);
while (robot->step(timeStep) != -1) { speeds[0] = maxVelocity; speeds[1] = maxVelocity;
if (leftDist->getValue() < 0.05) // Wall on the left: turn right turnRight(); if (rightDist->getValue() < 0.05) // Wall on the right: turn left turnLeft(); if (frontDist->getValue() < 0.05) // Wall in front: spin spin();
if (getBrightness() < 80) { // Black floor: turn away from the hole spin(); leftWheel->setVelocity(speeds[0]); rightWheel->setVelocity(speeds[1]); delay(600); }
// Close to a wall, and something on it: report it if (frontDist->getValue() < 0.07 && !alreadyReported() && seesToken(camera->getImage())) report('H'); // The type cannot be told yet, so guess 'H'
leftWheel->setVelocity(speeds[0]); rightWheel->setVelocity(speeds[1]); }
delete robot; return 0;}¿Qué tal lo hace?
Sección titulada «¿Qué tal lo hace?»Este robot deambula: no sabe por dónde ha pasado y adivina el tipo de cada víctima. A veces se atasca, y la partida lo devuelve a un punto de control (checkpoint) tras 20 segundos. Para un primer programa está bien.
Pruébalo
Sección titulada «Pruébalo»- Encuentra las mejores velocidades y distancias para tu robot.
- Sigue la pared de un lado: mantén el sensor lateral a una distancia constante y gira cuando el sensor frontal vea una pared.
- Cambia la velocidad según lo cerca que estén las paredes.
Después, aprende a sumar puntos en Comunicación.

Erebus forma parte de RoboCupJunior Rescue.
Noticias, eventos y documentos de equipos: sitio web de la comunidad RCJ Rescue
© 2020–2026 Erebus Development Team