

 Bahasa Indonesia
 Deutsch
 English
 Español
 Français
 Português (Brasil)
 Türkçe
 中文(简体)
 中文(繁體)
 日本語
 한국어
นำทางในเขาวงกต
ในบทเรียนนี้ คุณจะสร้างโปรแกรมที่สมบูรณ์ทีละขั้น หุ่นยนต์จะวิ่งไปรอบเขาวงกตโดยหลบผนังและหลุม และรายงานทุกสิ่งที่ดูเหมือนสัญลักษณ์บนผนัง นี่คือโปรแกรมที่คุณรันในการรันครั้งแรกของคุณ
โปรแกรมนี้ใช้หุ่นยนต์เริ่มต้น และสิ่งที่คุณเรียนรู้ในการเคลื่อนที่ และเซนเซอร์
โปรแกรมฉบับสมบูรณ์: maze.py · maze.cpp
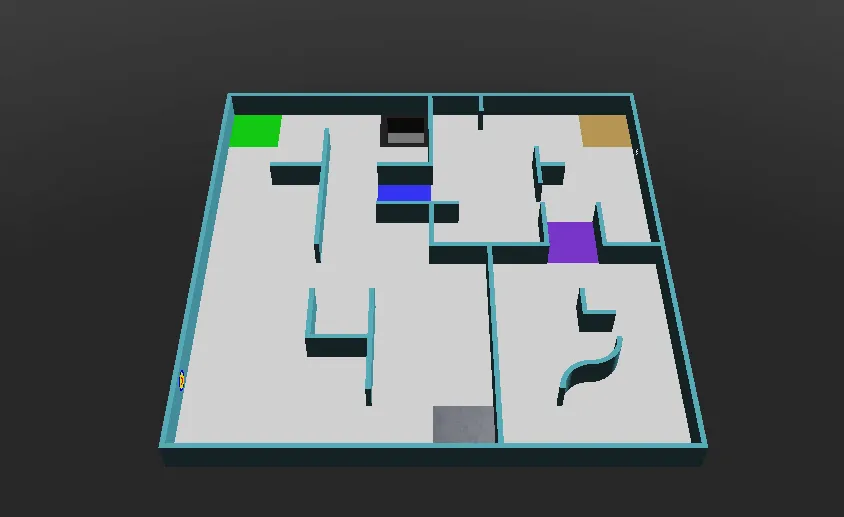
รันบน world1.wbt ซึ่งมีหน้าตาแบบนี้:
ทีละขั้นตอน
หัวข้อที่มีชื่อว่า “ทีละขั้นตอน”1. การตั้งค่าเริ่มต้น
หัวข้อที่มีชื่อว่า “1. การตั้งค่าเริ่มต้น”ขั้นแรก โปรแกรมสร้างหุ่นยนต์ รับมอเตอร์ล้อ และให้หมุนได้โดยไม่จำกัด speeds เก็บความเร็วของแต่ละล้อ ซึ่งส่วนอื่นของโปรแกรมจะเปลี่ยนค่า reported จดจำตำแหน่งที่หุ่นยนต์รายงานสัญลักษณ์ไปแล้ว
from controller import Robotimport structimport numpy as npimport cv2 as cv
robot = Robot()timeStep = 32         # Milliseconds between stepsmaxVelocity = 6.28    # The maximum speed of the wheels, in radians per second
leftWheel = robot.getDevice("left wheel motor")rightWheel = robot.getDevice("right wheel motor")leftWheel.setPosition(float("inf"))   # Let the wheels turn without limitrightWheel.setPosition(float("inf"))
speeds = [maxVelocity, maxVelocity]   # [left wheel speed, right wheel speed]reported = []                         # Positions where a token has already been reported
#include <array>#include <cmath>#include <cstring>#include <vector>#include <opencv2/opencv.hpp>#include <webots/Robot.hpp>#include <webots/Motor.hpp>#include <webots/DistanceSensor.hpp>#include <webots/Camera.hpp>#include <webots/Emitter.hpp>#include <webots/GPS.hpp>
using namespace webots;using namespace std;
Robot *robot = new Robot();const int timeStep = 32; // Milliseconds between stepsconst double maxVelocity = 6.28; // The maximum speed of the wheels, in radians per second
Motor *leftWheel = robot->getMotor("left wheel motor");Motor *rightWheel = robot->getMotor("right wheel motor");
double speeds[2] = {maxVelocity, maxVelocity}; // {left wheel speed, right wheel speed}vector<array<int, 2>> reported; // Positions where a token has already been reported2. เซนเซอร์
หัวข้อที่มีชื่อว่า “2. เซนเซอร์”ถัดไป โปรแกรมรับและเปิดใช้งานเซนเซอร์ของหุ่นยนต์เริ่มต้น:
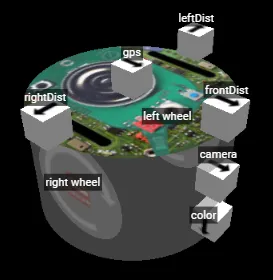
leftDist = robot.getDevice("leftDist")frontDist = robot.getDevice("frontDist")rightDist = robot.getDevice("rightDist")camera = robot.getDevice("camera")colorSensor = robot.getDevice("color")gps = robot.getDevice("gps")emitter = robot.getDevice("emitter")  # The emitter does not need to be enabled
for sensor in [leftDist, frontDist, rightDist, camera, colorSensor, gps]:    sensor.enable(timeStep)
DistanceSensor *leftDist = robot->getDistanceSensor("leftDist");DistanceSensor *frontDist = robot->getDistanceSensor("frontDist");DistanceSensor *rightDist = robot->getDistanceSensor("rightDist");Camera *camera = robot->getCamera("camera");Camera *colorSensor = robot->getCamera("color");GPS *gps = robot->getGPS("gps");Emitter *emitter = robot->getEmitter("emitter"); // The emitter does not need to be enabled
void enableSensors() { leftDist->enable(timeStep); frontDist->enable(timeStep); rightDist->enable(timeStep); camera->enable(timeStep); colorSensor->enable(timeStep); gps->enable(timeStep);}3. การเคลื่อนที่
หัวข้อที่มีชื่อว่า “3. การเคลื่อนที่”ฟังก์ชันเหล่านี้เปลี่ยนความเร็วเพื่อเลี้ยวและหมุนตัว delay ทำให้หุ่นยนต์ทำสิ่งเดิมต่อไปตามจำนวนมิลลิวินาทีที่กำหนด และ getBrightness อ่านค่าเซนเซอร์สีเป็นค่าเดียวตั้งแต่ 0 (ดำ) ถึง 255 (ขาว)
def turnRight():    speeds[0] = 0.6 * maxVelocity    speeds[1] = -0.2 * maxVelocity
def turnLeft():    speeds[0] = -0.2 * maxVelocity    speeds[1] = 0.6 * maxVelocity
def spin():    speeds[0] = 0.6 * maxVelocity    speeds[1] = -0.6 * maxVelocity
def delay(ms):    start = robot.getTime()    while robot.step(timeStep) != -1:        if (robot.getTime() - start) * 1000 > ms:            break
def getBrightness():    image = colorSensor.getImage()    return colorSensor.imageGetGray(image, colorSensor.getWidth(), 0, 0)  # 0 (black) to 255 (white)
void turnRight() { speeds[0] = 0.6 * maxVelocity; speeds[1] = -0.2 * maxVelocity;}
void turnLeft() { speeds[0] = -0.2 * maxVelocity; speeds[1] = 0.6 * maxVelocity;}
void spin() { speeds[0] = 0.6 * maxVelocity; speeds[1] = -0.6 * maxVelocity;}
void delay(int ms) { double start = robot->getTime(); while (robot->step(timeStep) != -1) { if ((robot->getTime() - start) * 1000 > ms) break; }}
int getBrightness() { const unsigned char *image = colorSensor->getImage(); return Camera::imageGetGray(image, colorSensor->getWidth(), 0, 0); // 0 (black) to 255 (white)}4. การมองเห็นสัญลักษณ์
หัวข้อที่มีชื่อว่า “4. การมองเห็นสัญลักษณ์”ฟังก์ชันนี้ค้นหาสัญลักษณ์บนผนังในภาพจากกล้อง สัญลักษณ์เป็นสี่เหลี่ยมสว่างบนผนังสีเข้ม ฟังก์ชันจึงมองหารูปทรงสว่างที่เกือบเป็นสี่เหลี่ยมจัตุรัสและไม่แตะขอบภาพ ซึ่งมักเป็นตำแหน่งของพื้น
def seesToken(image): height, width = camera.getHeight(), camera.getWidth() image = np.frombuffer(image, np.uint8).reshape((height, width, 4)) # BGRA image for OpenCV gray = cv.cvtColor(image, cv.COLOR_BGRA2GRAY) _, bright = cv.threshold(gray, 200, 255, cv.THRESH_BINARY) # Bright parts in white contours, _ = cv.findContours(bright, cv.RETR_EXTERNAL, cv.CHAIN_APPROX_SIMPLE) for contour in contours: x, y, w, h = cv.boundingRect(contour) if x == 0 or y == 0 or x + w == width or y + h == height: continue # Shapes touching the edge of the image are usually the floor if cv.contourArea(contour) > 40 and 0.65 < w / h < 1.5: return True # A bright, roughly square shape on a wall return Falsebool seesToken(const unsigned char *image) { int height = camera->getHeight(), width = camera->getWidth(); cv::Mat frame(height, width, CV_8UC4, (void *)image); // BGRA image for OpenCV cv::Mat gray, bright; cv::cvtColor(frame, gray, cv::COLOR_BGRA2GRAY); cv::threshold(gray, bright, 200, 255, cv::THRESH_BINARY); // Bright parts in white vector<vector<cv::Point>> contours; cv::findContours(bright, contours, cv::RETR_EXTERNAL, cv::CHAIN_APPROX_SIMPLE); for (const auto &contour : contours) { cv::Rect box = cv::boundingRect(contour); if (box.x == 0 || box.y == 0 || box.x + box.width == width || box.y + box.height == height) continue; // Shapes touching the edge of the image are usually the floor double ratio = (double)box.width / box.height; if (cv::contourArea(contour) > 40 && ratio > 0.65 && ratio < 1.5) return true; // A bright, roughly square shape on a wall } return false;}นี่เป็นจุดเริ่มต้นแบบง่าย: ฟังก์ชันนี้แยกแยะสัญลักษณ์ไม่ได้ และมองเห็นเป้าหมายเชิงรับรู้ได้ไม่ดี บทเรียนสัญลักษณ์บนผนัง แสดงวิธีทำให้ดีขึ้น
5. การรายงาน
หัวข้อที่มีชื่อว่า “5. การรายงาน”ในการทำคะแนนจากสัญลักษณ์ หุ่นยนต์ต้องหยุดนิ่งนานกว่า 1 วินาที แล้วส่งตำแหน่งและชนิดของสัญลักษณ์ สัญลักษณ์แต่ละอันได้คะแนนเพียงครั้งเดียว และการรายงานซ้ำจะเสีย 5 คะแนน โปรแกรมจึงจดจำตำแหน่งที่รายงานไปแล้ว การสื่อสาร อธิบายข้อความเหล่านี้
def report(tokenType):    leftWheel.setVelocity(0)  # Stop for more than 1 second    rightWheel.setVelocity(0)    delay(1300)    x = int(gps.getValues()[0] * 100)  # Meters to centimeters    z = int(gps.getValues()[2] * 100)    emitter.send(struct.pack("i i c", x, z, tokenType.encode()))    robot.step(timeStep)    reported.append((x, z))
def alreadyReported():    # Reporting the same token again is a misidentification    x = gps.getValues()[0] * 100    z = gps.getValues()[2] * 100    return any(abs(x - rx) < 12 and abs(z - rz) < 12 for rx, rz in reported)  # Closer than 1 tile
void report(char tokenType) { leftWheel->setVelocity(0); // Stop for more than 1 second rightWheel->setVelocity(0); delay(1300); int x = (int)(gps->getValues()[0] * 100); // Meters to centimeters int z = (int)(gps->getValues()[2] * 100); char message[9]; memcpy(&message[0], &x, 4); memcpy(&message[4], &z, 4); message[8] = tokenType; emitter->send(message, 9); robot->step(timeStep); reported.push_back({x, z});}
bool alreadyReported() { // Reporting the same token again is a misidentification double x = gps->getValues()[0] * 100, z = gps->getValues()[2] * 100; for (const auto &position : reported) if (fabs(x - position[0]) < 12 && fabs(z - position[1]) < 12) // Closer than 1 tile return true; return false;}6. ลูปหลัก
หัวข้อที่มีชื่อว่า “6. ลูปหลัก”สุดท้าย ลูปหลักรวมทุกอย่างเข้าด้วยกัน ในแต่ละสเต็ป หุ่นยนต์จะเริ่มที่ความเร็วสูงสุด เลี้ยวหนีผนัง หันกลับเมื่อเจอหลุม และรายงานสิ่งที่กล้องเห็นเมื่ออยู่ใกล้ผนังด้านหน้า
while robot.step(timeStep) != -1:    speeds[0] = maxVelocity    speeds[1] = maxVelocity
    if leftDist.getValue() < 0.05:   # Wall on the left: turn right        turnRight()    if rightDist.getValue() < 0.05:  # Wall on the right: turn left        turnLeft()    if frontDist.getValue() < 0.05:  # Wall in front: spin        spin()
    if getBrightness() < 80:         # Black floor: turn away from the hole        spin()        leftWheel.setVelocity(speeds[0])        rightWheel.setVelocity(speeds[1])        delay(600)
    # Close to a wall, and something on it: report it    if frontDist.getValue() < 0.07 and not alreadyReported() and seesToken(camera.getImage()):        report("H")  # The type cannot be told yet, so guess "H"
    leftWheel.setVelocity(speeds[0])    rightWheel.setVelocity(speeds[1])
int main() { enableSensors(); leftWheel->setPosition(INFINITY); // Let the wheels turn without limit rightWheel->setPosition(INFINITY);
while (robot->step(timeStep) != -1) { speeds[0] = maxVelocity; speeds[1] = maxVelocity;
if (leftDist->getValue() < 0.05) // Wall on the left: turn right turnRight(); if (rightDist->getValue() < 0.05) // Wall on the right: turn left turnLeft(); if (frontDist->getValue() < 0.05) // Wall in front: spin spin();
if (getBrightness() < 80) { // Black floor: turn away from the hole spin(); leftWheel->setVelocity(speeds[0]); rightWheel->setVelocity(speeds[1]); delay(600); }
// Close to a wall, and something on it: report it if (frontDist->getValue() < 0.07 && !alreadyReported() && seesToken(camera->getImage())) report('H'); // The type cannot be told yet, so guess 'H'
leftWheel->setVelocity(speeds[0]); rightWheel->setVelocity(speeds[1]); }
delete robot; return 0;}ทำได้ดีแค่ไหน?
หัวข้อที่มีชื่อว่า “ทำได้ดีแค่ไหน?”หุ่นยนต์ตัวนี้แค่เดินไปเรื่อย ๆ ไม่รู้ว่าเคยไปที่ใดมาแล้ว และเดาชนิดของผู้ประสบภัยทุกราย บางครั้งก็ติดอยู่ และเกมจะย้ายหุ่นยนต์กลับไปยังจุดตรวจหลังจาก 20 วินาที ซึ่งถือว่าดีพอสำหรับโปรแกรมแรก
ลองทำดู
หัวข้อที่มีชื่อว่า “ลองทำดู”- หาความเร็วและระยะที่ดีที่สุดสำหรับหุ่นยนต์ของคุณ
- เดินตามผนังด้านหนึ่ง: รักษาระยะของเซนเซอร์ด้านข้างให้คงที่ และเลี้ยวเมื่อเซนเซอร์ด้านหน้าเห็นผนัง
- เปลี่ยนความเร็วตามระยะห่างจากผนัง
จากนั้น เรียนรู้การทำคะแนนในการสื่อสาร

Erebus เป็นส่วนหนึ่งของ RoboCupJunior Rescue
ข่าว กิจกรรม และเอกสารของทีม: เว็บไซต์ชุมชน RCJ Rescue
© 2020–2026 Erebus Development Team