

 Bahasa Indonesia
 Deutsch
 English
 Español
 Français
 Türkçe
 ไทย
 中文(简体)
 中文(繁體)
 日本語
 한국어
Navegue pelo labirinto
Neste tutorial, você constrói um programa completo, passo a passo. O robô anda pelo labirinto evitando paredes e buracos e informa tudo o que parece ser um marcador de parede. É o programa que você executou em Sua primeira execução.
Ele usa o robô inicial e o que você aprendeu em Movimento e Sensores.
O programa completo: maze.py · maze.cpp
O campo
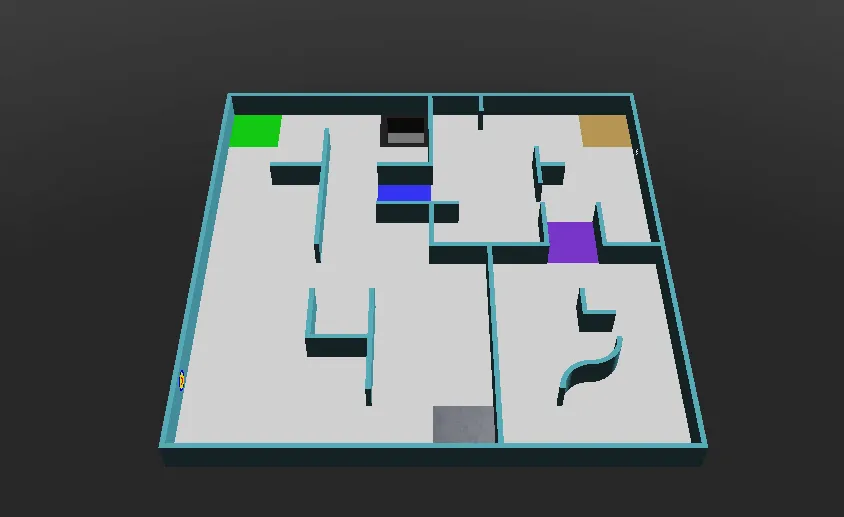
Seção intitulada “O campo”Execute-o em world1.wbt, que é assim:
Passo a passo
Seção intitulada “Passo a passo”1. Preparação
Seção intitulada “1. Preparação”Primeiro, o programa cria o robô, obtém os motores das rodas e deixa que eles girem sem limite. speeds guarda a velocidade de cada roda, que o resto do programa altera. reported lembra onde o robô já informou um marcador.
from controller import Robotimport structimport numpy as npimport cv2 as cv
robot = Robot()timeStep = 32         # Milliseconds between stepsmaxVelocity = 6.28    # The maximum speed of the wheels, in radians per second
leftWheel = robot.getDevice("left wheel motor")rightWheel = robot.getDevice("right wheel motor")leftWheel.setPosition(float("inf"))   # Let the wheels turn without limitrightWheel.setPosition(float("inf"))
speeds = [maxVelocity, maxVelocity]   # [left wheel speed, right wheel speed]reported = []                         # Positions where a token has already been reported
#include <array>#include <cmath>#include <cstring>#include <vector>#include <opencv2/opencv.hpp>#include <webots/Robot.hpp>#include <webots/Motor.hpp>#include <webots/DistanceSensor.hpp>#include <webots/Camera.hpp>#include <webots/Emitter.hpp>#include <webots/GPS.hpp>
using namespace webots;using namespace std;
Robot *robot = new Robot();const int timeStep = 32; // Milliseconds between stepsconst double maxVelocity = 6.28; // The maximum speed of the wheels, in radians per second
Motor *leftWheel = robot->getMotor("left wheel motor");Motor *rightWheel = robot->getMotor("right wheel motor");
double speeds[2] = {maxVelocity, maxVelocity}; // {left wheel speed, right wheel speed}vector<array<int, 2>> reported; // Positions where a token has already been reported2. Sensores
Seção intitulada “2. Sensores”Em seguida, ele obtém e ativa os sensores do robô inicial:
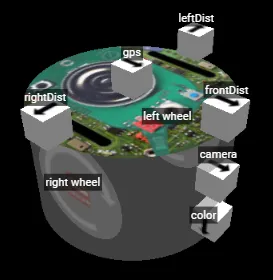
leftDist = robot.getDevice("leftDist")frontDist = robot.getDevice("frontDist")rightDist = robot.getDevice("rightDist")camera = robot.getDevice("camera")colorSensor = robot.getDevice("color")gps = robot.getDevice("gps")emitter = robot.getDevice("emitter")  # The emitter does not need to be enabled
for sensor in [leftDist, frontDist, rightDist, camera, colorSensor, gps]:    sensor.enable(timeStep)
DistanceSensor *leftDist = robot->getDistanceSensor("leftDist");DistanceSensor *frontDist = robot->getDistanceSensor("frontDist");DistanceSensor *rightDist = robot->getDistanceSensor("rightDist");Camera *camera = robot->getCamera("camera");Camera *colorSensor = robot->getCamera("color");GPS *gps = robot->getGPS("gps");Emitter *emitter = robot->getEmitter("emitter"); // The emitter does not need to be enabled
void enableSensors() { leftDist->enable(timeStep); frontDist->enable(timeStep); rightDist->enable(timeStep); camera->enable(timeStep); colorSensor->enable(timeStep); gps->enable(timeStep);}3. Movimentos
Seção intitulada “3. Movimentos”Estas funções mudam as velocidades para fazer curvas e girar no lugar. delay mantém o robô fazendo a mesma coisa por um determinado número de milissegundos, e getBrightness lê o sensor de cor como um único valor de 0 (preto) a 255 (branco).
def turnRight():    speeds[0] = 0.6 * maxVelocity    speeds[1] = -0.2 * maxVelocity
def turnLeft():    speeds[0] = -0.2 * maxVelocity    speeds[1] = 0.6 * maxVelocity
def spin():    speeds[0] = 0.6 * maxVelocity    speeds[1] = -0.6 * maxVelocity
def delay(ms):    start = robot.getTime()    while robot.step(timeStep) != -1:        if (robot.getTime() - start) * 1000 > ms:            break
def getBrightness():    image = colorSensor.getImage()    return colorSensor.imageGetGray(image, colorSensor.getWidth(), 0, 0)  # 0 (black) to 255 (white)
void turnRight() { speeds[0] = 0.6 * maxVelocity; speeds[1] = -0.2 * maxVelocity;}
void turnLeft() { speeds[0] = -0.2 * maxVelocity; speeds[1] = 0.6 * maxVelocity;}
void spin() { speeds[0] = 0.6 * maxVelocity; speeds[1] = -0.6 * maxVelocity;}
void delay(int ms) { double start = robot->getTime(); while (robot->step(timeStep) != -1) { if ((robot->getTime() - start) * 1000 > ms) break; }}
int getBrightness() { const unsigned char *image = colorSensor->getImage(); return Camera::imageGetGray(image, colorSensor->getWidth(), 0, 0); // 0 (black) to 255 (white)}4. Vendo um marcador
Seção intitulada “4. Vendo um marcador”Esta função procura marcadores de parede em uma imagem da câmera. Os marcadores são quadrados claros em paredes escuras, então ela procura formas claras que sejam mais ou menos quadradas e não encostem na borda da imagem, onde normalmente fica o piso.
def seesToken(image): height, width = camera.getHeight(), camera.getWidth() image = np.frombuffer(image, np.uint8).reshape((height, width, 4)) # BGRA image for OpenCV gray = cv.cvtColor(image, cv.COLOR_BGRA2GRAY) _, bright = cv.threshold(gray, 200, 255, cv.THRESH_BINARY) # Bright parts in white contours, _ = cv.findContours(bright, cv.RETR_EXTERNAL, cv.CHAIN_APPROX_SIMPLE) for contour in contours: x, y, w, h = cv.boundingRect(contour) if x == 0 or y == 0 or x + w == width or y + h == height: continue # Shapes touching the edge of the image are usually the floor if cv.contourArea(contour) > 40 and 0.65 < w / h < 1.5: return True # A bright, roughly square shape on a wall return Falsebool seesToken(const unsigned char *image) { int height = camera->getHeight(), width = camera->getWidth(); cv::Mat frame(height, width, CV_8UC4, (void *)image); // BGRA image for OpenCV cv::Mat gray, bright; cv::cvtColor(frame, gray, cv::COLOR_BGRA2GRAY); cv::threshold(gray, bright, 200, 255, cv::THRESH_BINARY); // Bright parts in white vector<vector<cv::Point>> contours; cv::findContours(bright, contours, cv::RETR_EXTERNAL, cv::CHAIN_APPROX_SIMPLE); for (const auto &contour : contours) { cv::Rect box = cv::boundingRect(contour); if (box.x == 0 || box.y == 0 || box.x + box.width == width || box.y + box.height == height) continue; // Shapes touching the edge of the image are usually the floor double ratio = (double)box.width / box.height; if (cv::contourArea(contour) > 40 && ratio > 0.65 && ratio < 1.5) return true; // A bright, roughly square shape on a wall } return false;}Este é um começo simples: ele não consegue diferenciar os símbolos e não enxerga bem os alvos cognitivos. O tutorial Marcadores nas paredes mostra como fazer melhor.
5. Informando
Seção intitulada “5. Informando”Para pontuar com um marcador, o robô precisa parar por mais de 1 segundo e enviar a sua posição e o tipo do marcador. Cada marcador só pode ser pontuado uma vez, e informá-lo de novo custa 5 pontos, então o programa lembra onde já informou. Comunicação explica essas mensagens.
def report(tokenType):    leftWheel.setVelocity(0)  # Stop for more than 1 second    rightWheel.setVelocity(0)    delay(1300)    x = int(gps.getValues()[0] * 100)  # Meters to centimeters    z = int(gps.getValues()[2] * 100)    emitter.send(struct.pack("i i c", x, z, tokenType.encode()))    robot.step(timeStep)    reported.append((x, z))
def alreadyReported():    # Reporting the same token again is a misidentification    x = gps.getValues()[0] * 100    z = gps.getValues()[2] * 100    return any(abs(x - rx) < 12 and abs(z - rz) < 12 for rx, rz in reported)  # Closer than 1 tile
void report(char tokenType) { leftWheel->setVelocity(0); // Stop for more than 1 second rightWheel->setVelocity(0); delay(1300); int x = (int)(gps->getValues()[0] * 100); // Meters to centimeters int z = (int)(gps->getValues()[2] * 100); char message[9]; memcpy(&message[0], &x, 4); memcpy(&message[4], &z, 4); message[8] = tokenType; emitter->send(message, 9); robot->step(timeStep); reported.push_back({x, z});}
bool alreadyReported() { // Reporting the same token again is a misidentification double x = gps->getValues()[0] * 100, z = gps->getValues()[2] * 100; for (const auto &position : reported) if (fabs(x - position[0]) < 12 && fabs(z - position[1]) < 12) // Closer than 1 tile return true; return false;}6. O laço principal
Seção intitulada “6. O laço principal”Por fim, o laço principal junta tudo. A cada passo, ele começa em velocidade máxima, desvia das paredes, recua dos buracos e informa o que a câmera vê quando está perto de uma parede à frente.
while robot.step(timeStep) != -1:    speeds[0] = maxVelocity    speeds[1] = maxVelocity
    if leftDist.getValue() < 0.05:   # Wall on the left: turn right        turnRight()    if rightDist.getValue() < 0.05:  # Wall on the right: turn left        turnLeft()    if frontDist.getValue() < 0.05:  # Wall in front: spin        spin()
    if getBrightness() < 80:         # Black floor: turn away from the hole        spin()        leftWheel.setVelocity(speeds[0])        rightWheel.setVelocity(speeds[1])        delay(600)
    # Close to a wall, and something on it: report it    if frontDist.getValue() < 0.07 and not alreadyReported() and seesToken(camera.getImage()):        report("H")  # The type cannot be told yet, so guess "H"
    leftWheel.setVelocity(speeds[0])    rightWheel.setVelocity(speeds[1])
int main() { enableSensors(); leftWheel->setPosition(INFINITY); // Let the wheels turn without limit rightWheel->setPosition(INFINITY);
while (robot->step(timeStep) != -1) { speeds[0] = maxVelocity; speeds[1] = maxVelocity;
if (leftDist->getValue() < 0.05) // Wall on the left: turn right turnRight(); if (rightDist->getValue() < 0.05) // Wall on the right: turn left turnLeft(); if (frontDist->getValue() < 0.05) // Wall in front: spin spin();
if (getBrightness() < 80) { // Black floor: turn away from the hole spin(); leftWheel->setVelocity(speeds[0]); rightWheel->setVelocity(speeds[1]); delay(600); }
// Close to a wall, and something on it: report it if (frontDist->getValue() < 0.07 && !alreadyReported() && seesToken(camera->getImage())) report('H'); // The type cannot be told yet, so guess 'H'
leftWheel->setVelocity(speeds[0]); rightWheel->setVelocity(speeds[1]); }
delete robot; return 0;}Como ele se sai?
Seção intitulada “Como ele se sai?”Este robô vagueia: ele não sabe por onde já passou e chuta o tipo de cada vítima. Às vezes ele fica preso, e a partida o leva de volta a um ponto de controle após 20 segundos. Para um primeiro programa, tudo bem.
Experimente
Seção intitulada “Experimente”- Encontre as melhores velocidades e distâncias para o seu robô.
- Siga a parede de um lado: mantenha o sensor lateral a uma distância constante e vire quando o sensor da frente vir uma parede.
- Mude a velocidade de acordo com a proximidade das paredes.
Depois, aprenda a marcar pontos em Comunicação.

O Erebus faz parte da RoboCupJunior Rescue.
Notícias, eventos e documentos das equipes: site da comunidade RCJ Rescue
© 2020–2026 Erebus Development Team