

 Bahasa Indonesia
 Deutsch
 English
 Español
 Português (Brasil)
 Türkçe
 ไทย
 中文(简体)
 中文(繁體)
 日本語
 한국어
Parcourir le labyrinthe
Dans ce tutoriel, vous construisez un programme complet, étape par étape. Le robot parcourt le labyrinthe en évitant les murs et les trous, et signale tout ce qui ressemble à un marqueur mural. C’est le programme que vous avez exécuté dans Votre premier essai.
Il utilise le robot de départ, et ce que vous avez appris dans Déplacement et Capteurs.
Le programme complet : maze.py · maze.cpp
Le terrain
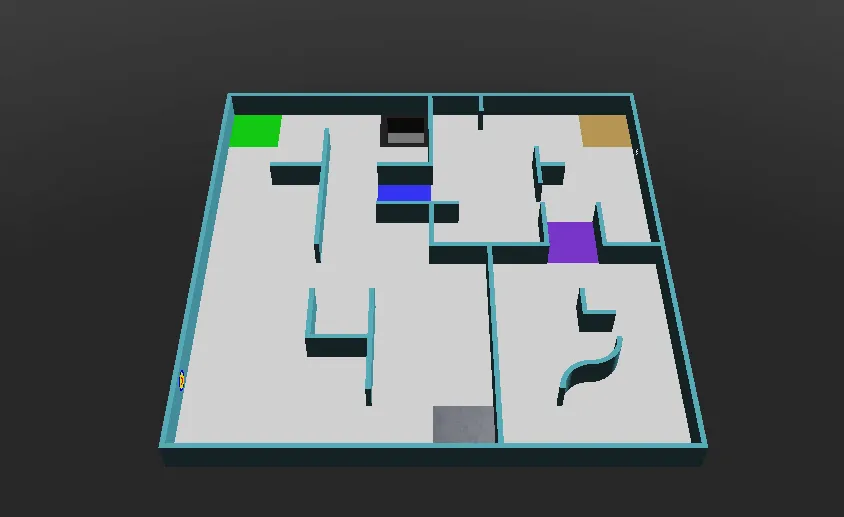
Section intitulée « Le terrain »Exécutez-le sur world1.wbt, qui ressemble à ceci :
Étape par étape
Section intitulée « Étape par étape »1. Initialisation
Section intitulée « 1. Initialisation »Le programme commence par créer le robot, obtenir les moteurs des roues et les laisser tourner sans limite. speeds contient la vitesse de chaque roue, que le reste du programme modifie. reported mémorise les endroits où le robot a déjà signalé un marqueur.
from controller import Robotimport structimport numpy as npimport cv2 as cv
robot = Robot()timeStep = 32         # Milliseconds between stepsmaxVelocity = 6.28    # The maximum speed of the wheels, in radians per second
leftWheel = robot.getDevice("left wheel motor")rightWheel = robot.getDevice("right wheel motor")leftWheel.setPosition(float("inf"))   # Let the wheels turn without limitrightWheel.setPosition(float("inf"))
speeds = [maxVelocity, maxVelocity]   # [left wheel speed, right wheel speed]reported = []                         # Positions where a token has already been reported
#include <array>#include <cmath>#include <cstring>#include <vector>#include <opencv2/opencv.hpp>#include <webots/Robot.hpp>#include <webots/Motor.hpp>#include <webots/DistanceSensor.hpp>#include <webots/Camera.hpp>#include <webots/Emitter.hpp>#include <webots/GPS.hpp>
using namespace webots;using namespace std;
Robot *robot = new Robot();const int timeStep = 32; // Milliseconds between stepsconst double maxVelocity = 6.28; // The maximum speed of the wheels, in radians per second
Motor *leftWheel = robot->getMotor("left wheel motor");Motor *rightWheel = robot->getMotor("right wheel motor");
double speeds[2] = {maxVelocity, maxVelocity}; // {left wheel speed, right wheel speed}vector<array<int, 2>> reported; // Positions where a token has already been reported2. Capteurs
Section intitulée « 2. Capteurs »Ensuite, il obtient et active les capteurs du robot de départ :
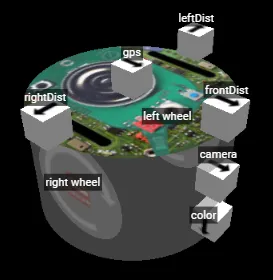
leftDist = robot.getDevice("leftDist")frontDist = robot.getDevice("frontDist")rightDist = robot.getDevice("rightDist")camera = robot.getDevice("camera")colorSensor = robot.getDevice("color")gps = robot.getDevice("gps")emitter = robot.getDevice("emitter")  # The emitter does not need to be enabled
for sensor in [leftDist, frontDist, rightDist, camera, colorSensor, gps]:    sensor.enable(timeStep)
DistanceSensor *leftDist = robot->getDistanceSensor("leftDist");DistanceSensor *frontDist = robot->getDistanceSensor("frontDist");DistanceSensor *rightDist = robot->getDistanceSensor("rightDist");Camera *camera = robot->getCamera("camera");Camera *colorSensor = robot->getCamera("color");GPS *gps = robot->getGPS("gps");Emitter *emitter = robot->getEmitter("emitter"); // The emitter does not need to be enabled
void enableSensors() { leftDist->enable(timeStep); frontDist->enable(timeStep); rightDist->enable(timeStep); camera->enable(timeStep); colorSensor->enable(timeStep); gps->enable(timeStep);}3. Mouvements
Section intitulée « 3. Mouvements »Ces fonctions modifient les vitesses pour tourner et pivoter. delay fait continuer le robot à faire la même chose pendant un nombre donné de millisecondes, et getBrightness lit le capteur de couleur sous la forme d’une seule valeur, de 0 (noir) à 255 (blanc).
def turnRight():    speeds[0] = 0.6 * maxVelocity    speeds[1] = -0.2 * maxVelocity
def turnLeft():    speeds[0] = -0.2 * maxVelocity    speeds[1] = 0.6 * maxVelocity
def spin():    speeds[0] = 0.6 * maxVelocity    speeds[1] = -0.6 * maxVelocity
def delay(ms):    start = robot.getTime()    while robot.step(timeStep) != -1:        if (robot.getTime() - start) * 1000 > ms:            break
def getBrightness():    image = colorSensor.getImage()    return colorSensor.imageGetGray(image, colorSensor.getWidth(), 0, 0)  # 0 (black) to 255 (white)
void turnRight() { speeds[0] = 0.6 * maxVelocity; speeds[1] = -0.2 * maxVelocity;}
void turnLeft() { speeds[0] = -0.2 * maxVelocity; speeds[1] = 0.6 * maxVelocity;}
void spin() { speeds[0] = 0.6 * maxVelocity; speeds[1] = -0.6 * maxVelocity;}
void delay(int ms) { double start = robot->getTime(); while (robot->step(timeStep) != -1) { if ((robot->getTime() - start) * 1000 > ms) break; }}
int getBrightness() { const unsigned char *image = colorSensor->getImage(); return Camera::imageGetGray(image, colorSensor->getWidth(), 0, 0); // 0 (black) to 255 (white)}4. Voir un marqueur
Section intitulée « 4. Voir un marqueur »Cette fonction cherche des marqueurs muraux dans une image de la caméra. Les marqueurs sont des carrés clairs sur des murs sombres : elle cherche donc des formes claires, à peu près carrées, qui ne touchent pas le bord de l’image, là où se trouve généralement le sol.
def seesToken(image): height, width = camera.getHeight(), camera.getWidth() image = np.frombuffer(image, np.uint8).reshape((height, width, 4)) # BGRA image for OpenCV gray = cv.cvtColor(image, cv.COLOR_BGRA2GRAY) _, bright = cv.threshold(gray, 200, 255, cv.THRESH_BINARY) # Bright parts in white contours, _ = cv.findContours(bright, cv.RETR_EXTERNAL, cv.CHAIN_APPROX_SIMPLE) for contour in contours: x, y, w, h = cv.boundingRect(contour) if x == 0 or y == 0 or x + w == width or y + h == height: continue # Shapes touching the edge of the image are usually the floor if cv.contourArea(contour) > 40 and 0.65 < w / h < 1.5: return True # A bright, roughly square shape on a wall return Falsebool seesToken(const unsigned char *image) { int height = camera->getHeight(), width = camera->getWidth(); cv::Mat frame(height, width, CV_8UC4, (void *)image); // BGRA image for OpenCV cv::Mat gray, bright; cv::cvtColor(frame, gray, cv::COLOR_BGRA2GRAY); cv::threshold(gray, bright, 200, 255, cv::THRESH_BINARY); // Bright parts in white vector<vector<cv::Point>> contours; cv::findContours(bright, contours, cv::RETR_EXTERNAL, cv::CHAIN_APPROX_SIMPLE); for (const auto &contour : contours) { cv::Rect box = cv::boundingRect(contour); if (box.x == 0 || box.y == 0 || box.x + box.width == width || box.y + box.height == height) continue; // Shapes touching the edge of the image are usually the floor double ratio = (double)box.width / box.height; if (cv::contourArea(contour) > 40 && ratio > 0.65 && ratio < 1.5) return true; // A bright, roughly square shape on a wall } return false;}C’est un début simple : elle ne sait pas distinguer les symboles, et elle voit mal les cibles cognitives. Le tutoriel Marqueurs muraux montre comment faire mieux.
5. Signaler
Section intitulée « 5. Signaler »Pour marquer les points d’un marqueur, le robot doit s’arrêter plus d’une seconde et envoyer sa position et le type du marqueur. Chaque marqueur ne rapporte des points qu’une seule fois, et le signaler à nouveau coûte 5 points : le programme mémorise donc les endroits où il a signalé. Communication explique ces messages.
def report(tokenType):    leftWheel.setVelocity(0)  # Stop for more than 1 second    rightWheel.setVelocity(0)    delay(1300)    x = int(gps.getValues()[0] * 100)  # Meters to centimeters    z = int(gps.getValues()[2] * 100)    emitter.send(struct.pack("i i c", x, z, tokenType.encode()))    robot.step(timeStep)    reported.append((x, z))
def alreadyReported():    # Reporting the same token again is a misidentification    x = gps.getValues()[0] * 100    z = gps.getValues()[2] * 100    return any(abs(x - rx) < 12 and abs(z - rz) < 12 for rx, rz in reported)  # Closer than 1 tile
void report(char tokenType) { leftWheel->setVelocity(0); // Stop for more than 1 second rightWheel->setVelocity(0); delay(1300); int x = (int)(gps->getValues()[0] * 100); // Meters to centimeters int z = (int)(gps->getValues()[2] * 100); char message[9]; memcpy(&message[0], &x, 4); memcpy(&message[4], &z, 4); message[8] = tokenType; emitter->send(message, 9); robot->step(timeStep); reported.push_back({x, z});}
bool alreadyReported() { // Reporting the same token again is a misidentification double x = gps->getValues()[0] * 100, z = gps->getValues()[2] * 100; for (const auto &position : reported) if (fabs(x - position[0]) < 12 && fabs(z - position[1]) < 12) // Closer than 1 tile return true; return false;}6. La boucle principale
Section intitulée « 6. La boucle principale »Enfin, la boucle principale réunit le tout. À chaque pas, elle repart à pleine vitesse, s’écarte des murs, fait demi-tour devant les trous, et signale ce que voit la caméra lorsqu’un mur est proche devant.
while robot.step(timeStep) != -1:    speeds[0] = maxVelocity    speeds[1] = maxVelocity
    if leftDist.getValue() < 0.05:   # Wall on the left: turn right        turnRight()    if rightDist.getValue() < 0.05:  # Wall on the right: turn left        turnLeft()    if frontDist.getValue() < 0.05:  # Wall in front: spin        spin()
    if getBrightness() < 80:         # Black floor: turn away from the hole        spin()        leftWheel.setVelocity(speeds[0])        rightWheel.setVelocity(speeds[1])        delay(600)
    # Close to a wall, and something on it: report it    if frontDist.getValue() < 0.07 and not alreadyReported() and seesToken(camera.getImage()):        report("H")  # The type cannot be told yet, so guess "H"
    leftWheel.setVelocity(speeds[0])    rightWheel.setVelocity(speeds[1])
int main() { enableSensors(); leftWheel->setPosition(INFINITY); // Let the wheels turn without limit rightWheel->setPosition(INFINITY);
while (robot->step(timeStep) != -1) { speeds[0] = maxVelocity; speeds[1] = maxVelocity;
if (leftDist->getValue() < 0.05) // Wall on the left: turn right turnRight(); if (rightDist->getValue() < 0.05) // Wall on the right: turn left turnLeft(); if (frontDist->getValue() < 0.05) // Wall in front: spin spin();
if (getBrightness() < 80) { // Black floor: turn away from the hole spin(); leftWheel->setVelocity(speeds[0]); rightWheel->setVelocity(speeds[1]); delay(600); }
// Close to a wall, and something on it: report it if (frontDist->getValue() < 0.07 && !alreadyReported() && seesToken(camera->getImage())) report('H'); // The type cannot be told yet, so guess 'H'
leftWheel->setVelocity(speeds[0]); rightWheel->setVelocity(speeds[1]); }
delete robot; return 0;}Quels résultats ?
Section intitulée « Quels résultats ? »Ce robot erre : il ne sait pas où il est déjà passé, et il devine le type de chaque victime. Il se retrouve parfois bloqué, et le jeu le ramène à un point de contrôle (checkpoint) au bout de 20 secondes. Pour un premier programme, cela suffit.
À vous de jouer
Section intitulée « À vous de jouer »- Trouvez les meilleures vitesses et distances pour votre robot.
- Suivez le mur d’un côté : gardez le capteur latéral à distance constante, et tournez quand le capteur avant voit un mur.
- Modifiez la vitesse selon la proximité des murs.
Ensuite, apprenez à marquer des points dans Communication.

Erebus fait partie de RoboCupJunior Rescue.
Actualités, événements et documents d’équipe : site de la communauté RCJ Rescue
© 2020–2026 Erebus Development Team