
 Bahasa Indonesia
 Deutsch
 English
 Español
 Português (Brasil)
 Türkçe
 ไทย
 中文(简体)
 中文(繁體)
 日本語
 한국어
Caméra RVB
La caméra donne une image de ce qui se trouve devant elle. Vous en avez besoin pour trouver et lire les marqueurs muraux. Le robot de départ a une caméra, nommée camera, de 64 × 40 pixels.
Lire les pixels
Section intitulée « Lire les pixels »Une image est une grille de pixels. Chacun a une valeur de rouge, de vert et de bleu (RVB) de 0 à 255, où (0, 0, 0) est le noir et (255, 255, 255) le blanc.
from controller import Robot
robot = Robot()timeStep = int(robot.getBasicTimeStep())
camera = robot.getDevice("camera")camera.enable(timeStep)width = camera.getWidth()height = camera.getHeight()print("The camera has", width, "x", height, "pixels")
while robot.step(timeStep) != -1:    image = camera.getImage()    # The colour of the pixel in the center of the image    r = camera.imageGetRed(image, width, width // 2, height // 2)    g = camera.imageGetGreen(image, width, width // 2, height // 2)    b = camera.imageGetBlue(image, width, width // 2, height // 2)    print("Center:", r, g, b)
#include <iostream>#include <webots/Robot.hpp>#include <webots/Camera.hpp>
using namespace webots;using namespace std;
int main() { Robot *robot = new Robot(); int timeStep = (int)robot->getBasicTimeStep();
Camera *camera = robot->getCamera("camera"); camera->enable(timeStep); int width = camera->getWidth(); int height = camera->getHeight(); cout << "The camera has " << width << " x " << height << " pixels" << endl;
while (robot->step(timeStep) != -1) { const unsigned char *image = camera->getImage(); // The colour of the pixel in the center of the image int r = Camera::imageGetRed(image, width, width / 2, height / 2); int g = Camera::imageGetGreen(image, width, width / 2, height / 2); int b = Camera::imageGetBlue(image, width, width / 2, height / 2); cout << "Center: " << r << " " << g << " " << b << endl; }
delete robot; return 0;}Utiliser OpenCV
Section intitulée « Utiliser OpenCV »OpenCV est une bibliothèque de traitement d’images : trouver des formes, comparer des couleurs et bien plus encore. Les images de Webots ont 4 valeurs par pixel, dans l’ordre BGRA, qu’OpenCV peut utiliser directement. Ce programme affiche l’image, et ses parties claires, dans deux fenêtres :
from controller import Robotimport cv2import numpy as np
robot = Robot()timeStep = int(robot.getBasicTimeStep())
camera = robot.getDevice("camera")camera.enable(timeStep)
while robot.step(timeStep) != -1:    # Webots images have 4 channels per pixel, in BGRA order    image = np.frombuffer(camera.getImage(), np.uint8).reshape((camera.getHeight(), camera.getWidth(), 4))    frame = cv2.cvtColor(image, cv2.COLOR_BGRA2BGR)    gray = cv2.cvtColor(frame, cv2.COLOR_BGR2GRAY)    _, thresh = cv2.threshold(gray, 200, 255, cv2.THRESH_BINARY)  # Bright parts in white
    cv2.imshow("camera", cv2.resize(frame, None, fx=4, fy=4, interpolation=cv2.INTER_NEAREST))    cv2.imshow("threshold", cv2.resize(thresh, None, fx=4, fy=4, interpolation=cv2.INTER_NEAREST))    cv2.waitKey(1)  # Shows the windows
#include <opencv2/opencv.hpp>#include <webots/Robot.hpp>#include <webots/Camera.hpp>
using namespace webots;
int main() { Robot *robot = new Robot(); int timeStep = (int)robot->getBasicTimeStep();
Camera *camera = robot->getCamera("camera"); camera->enable(timeStep);
while (robot->step(timeStep) != -1) { // Webots images have 4 channels per pixel, in BGRA order cv::Mat image(camera->getHeight(), camera->getWidth(), CV_8UC4, (void *)camera->getImage()); cv::Mat frame, gray, thresh; cv::cvtColor(image, frame, cv::COLOR_BGRA2BGR); cv::cvtColor(frame, gray, cv::COLOR_BGR2GRAY); cv::threshold(gray, thresh, 200, 255, cv::THRESH_BINARY); // Bright parts in white
cv::Mat big; cv::resize(frame, big, cv::Size(), 4, 4, cv::INTER_NEAREST); cv::imshow("camera", big); cv::resize(thresh, big, cv::Size(), 4, 4, cv::INTER_NEAREST); cv::imshow("threshold", big); cv::waitKey(1); // Shows the windows }
delete robot; return 0;}À gauche, une image de la caméra du robot de départ devant une victime lettre. À droite, ses parties claires, telles que ce programme les trouve.
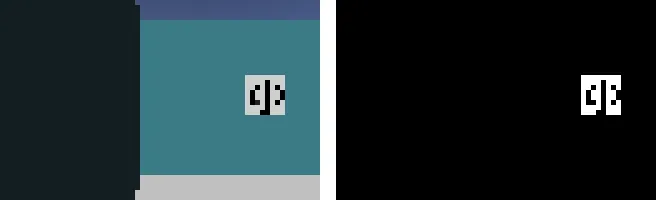
Les fenêtres comme celles-ci servent aux tests à la maison : désactivez-les pour la compétition.
Résolution
Section intitulée « Résolution »Une résolution plus élevée permet de voir les marqueurs de plus loin, mais coûte plus cher et demande plus de temps de traitement. Vous choisissez la résolution de chaque caméra dans le Robot Customizer.

Erebus fait partie de RoboCupJunior Rescue.
Actualités, événements et documents d’équipe : site de la communauté RCJ Rescue
© 2020–2026 Erebus Development Team