

 Bahasa Indonesia
 Deutsch
 Español
 Français
 Português (Brasil)
 Türkçe
 ไทย
 中文(简体)
 中文(繁體)
 日本語
 한국어
Wall Tokens
What the robot has to do
Section titled “What the robot has to do”Wall tokens are worth most of your points, and every wrong report costs 5 points. So for each token you find, you have to decide between:
| It is… | What to do |
|---|---|
| A letter victim (Φ, Ψ, Ω) | Report H, S or U |
| A fake victim (the same symbols, three-dimensional) | Do not report it, and leave it out of the map |
| A cognitive target with a sum of 0 to 3 | Report F, P, C or O |
| A cognitive target with any other sum | It is fake: do not report it, and leave it out of the map |
See Rules for the exact definitions, and Communication for how to send the report.
What the camera sees
Section titled “What the camera sees”The camera of the starter robot has 64 × 40 pixels. At that resolution, a token is only a few pixels until the robot is close, so it is best to look for candidates from a distance, and then get closer to read them. Remember that a report needs the robot within half a tile of the token, and that custom cameras can have a higher resolution, at a cost.
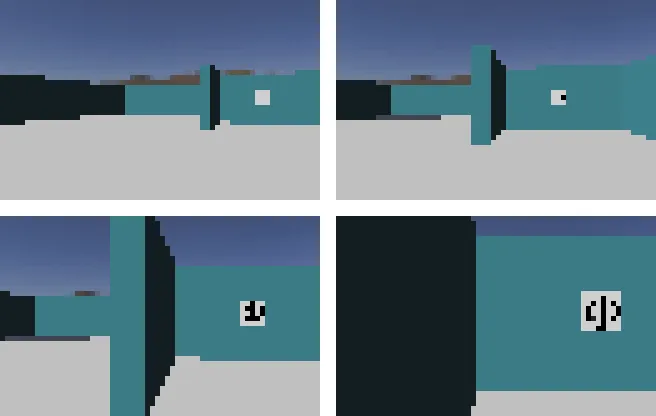

Letter victims are black symbols on a white square, and they can be rotated to any angle, so your method must not depend on the orientation.

Reading a cognitive target
Section titled “Reading a cognitive target”A cognitive target is made of five concentric parts, so there is no need to recognize its shape: once you have found its centre and its outer radius, you can sample the colour in the middle of each part. The parts have radii of 0.5, 1, 1.5, 2 and 2.5 cm, so their middle points are at 0, 0.3, 0.5, 0.7 and 0.9 of the outer radius.
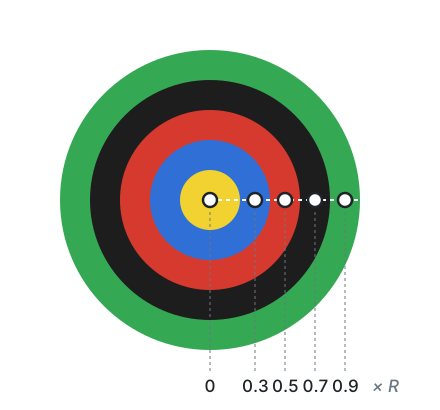
This function does that with OpenCV in Python. To find the centre and the radius, you can for example use the contour of the target, as in Navigate the maze.
import cv2 as cvimport numpy as np
# Colour of each part in BGR order, as seen by the cameraCOLORS = {    'K': (0, 0, 0),      # Black    'R': (0, 0, 255),    # Red    'Y': (0, 255, 255),  # Yellow    'G': (0, 255, 0),    # Green    'B': (255, 0, 0),    # Blue}
def nearestColor(bgr):    # Returns the name of the colour that is closest to a pixel    distances = {name: np.linalg.norm(np.array(color) - bgr) for name, color in COLORS.items()}    return min(distances, key=distances.get)
def readRings(image, centerX, centerY, radius):    # image is a BGR image, as in the RGB Camera tutorial    # Returns the 5 colours from the center outwards, for example ['Y', 'B', 'R', 'K', 'G']    rings = []    for position in [0, 0.3, 0.5, 0.7, 0.9]:        x = int(round(centerX + position * radius))        y = int(round(centerY))        rings.append(nearestColor(image[y, x].astype(float)))    return rings
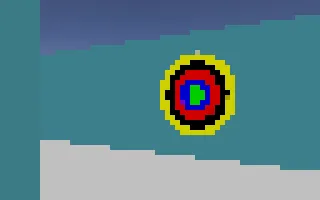
In a real run, the target may be viewed at an angle, in which case it looks like an ellipse. Getting in front of it, using the colours that look wrong as a warning, or reading several frames will make the result more reliable.
Calculating the type
Section titled “Calculating the type”Once you have the five colours, the code to report comes from their sum. Each of the five parts always counts, even when neighbouring colours are the same.
VALUES = {'K': -2, 'R': -1, 'Y': 0, 'G': 1, 'B': 2}CODES = {0: 'F', 1: 'P', 2: 'C', 3: 'O'}
def targetCode(rings):    # rings is the list of the 5 colours of the target    # Returns the code to report, or None if the target is fake    total = sum(VALUES[color] for color in rings)    return CODES.get(total)
#include <map>#include <vector>
using namespace std;
// rings has the 5 colours of the target: 'K', 'R', 'Y', 'G' or 'B'// Returns the code to report, or 0 if the target is fakechar targetCode(const vector<char>& rings) { map<char, int> values = {{'K', -2}, {'R', -1}, {'Y', 0}, {'G', 1}, {'B', 2}}; int total = 0; for (char color : rings) total += values[color];
switch (total) { case 0: return 'F'; case 1: return 'P'; case 2: return 'C'; case 3: return 'O'; default: return 0; }}For example, ['Y', 'B', 'R', 'K', 'G'] adds up to 0, so it is F, and ['B', 'Y', 'K', 'K', 'K'] adds up to -4, so it is fake.
Detecting fake victims
Section titled “Detecting fake victims”Fake victims show the same symbols as real ones, but the letters are three-dimensional. From the front, a camera alone may not be able to tell them apart:
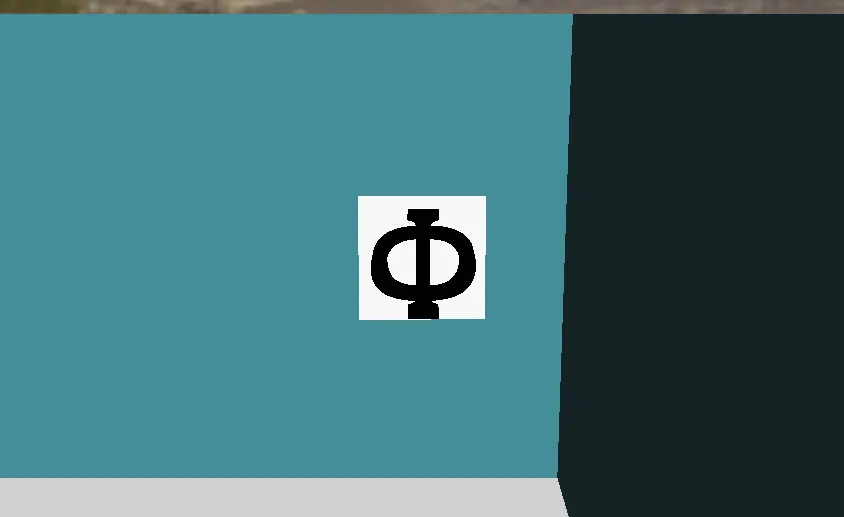
The rules state that the depth can be detected with one of the sensors available in the Robot Customizer. Some ideas to explore:
- Compare distance measurements taken across the token, with a Lidar or with distance sensors, to look for a height difference.
- Look at the token from an angle, where a relief changes the shape of the symbol.
Worlds world3.wbt and world4.wbt include fake victims, and the World Editor can add them to your own maps. Erebus also includes the script scripts/update_maps_with_fakes.py, which randomly transforms victims of existing worlds into fakes.
Reporting a fake costs 5 points as a misidentification, while a real victim on a linear tile is worth 15 points with its type in Area 1, and more in other areas. Keep that in mind when you decide how sure your robot must be before it reports.

Erebus is part of RoboCupJunior Rescue.
News, events and team documents: RCJ Rescue Community Website
© 2020–2026 Erebus Development Team