In this seminar we cover how to generate a first robot controller to navigate around a maze like environment.
Introducing Your Robot
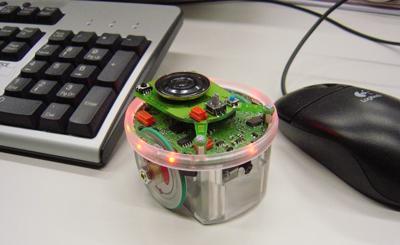
In this challenge, the robot is a customizable Epuck. You can design your robot here, adding the optimal sensors at the optimal positions. From there, you can export your robot as a JSON file, which you can then load into the robot window in Webots.
Field
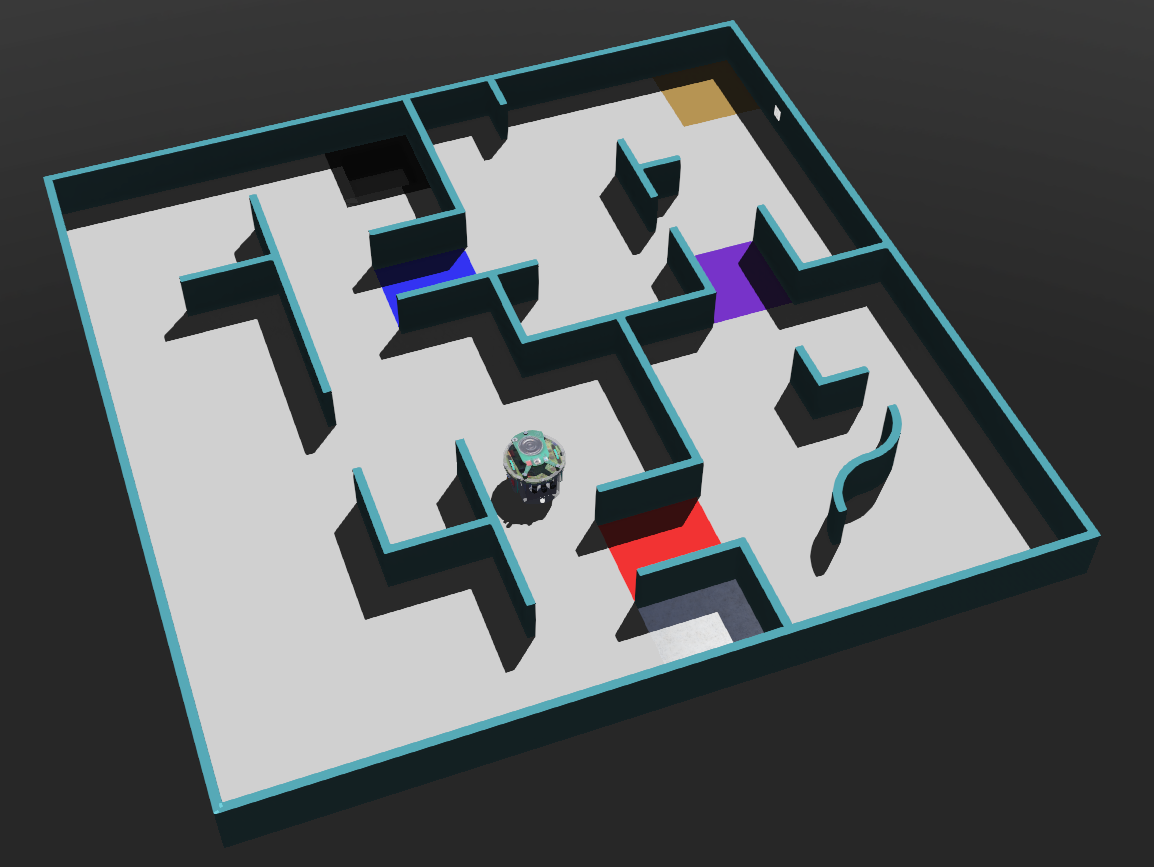
For the sample program, we will be working in a field similar to the one shown below. If you are unfamilar with how to find the various fields, visit the “Getting Started” section of the “Tutorials” section.
Tasks/Activities
After working on this seminar, work through the following tasks (of increasing difficulty):
Investigate different speeds/motions and sensor values - what is the most efficient values for navigating around the maze?
Alter the program to track around in the side walls of the maze. To do this think about how you could use the distance sensors from one side of the robot to track along a wall. You will still need to use the front distance sensors, so think carefully about what order to put you if statements for the different sensors!
To search quicker, could you vary the speed depending on how close you are to walls/objects? Look at using the sensor values to calculate the speed of the wheels.
Remember, for help/advice, or if you want to share ideas, head to discord.
Exemplar Code
Below we step through the example code developed step by step, explaining what is going on. Try and build this up by yourself first, referring back to this if you need. The full uninterrupted program can be found here: C++ | Python
Step-by-Step Introduction of the Code
First we initialise the robot and sensors. We import/include the necessary classes as we set the time step and also the maximum velocity of the robot. We also create a wheel_left and wheel_right object. (More details on the API can be found here). Lastly, we initialize an array to store the left and right motor speeds - we start by initalizing these to the max speed.
 1
 2
 3
 4
 5
 6
 7
 8
 9
10
11
12
13
14
15
from controller import Robot, Motor, DistanceSensor, Camera, Emitter, GPS
import struct
import numpy as np
import cv2 as cv
timeStep =32# Set the time step for the simulationmax_velocity =6.28# Set a maximum velocity time constantrobot = Robot()
wheel_left = robot.getDevice("left wheel motor") # Create an object to control the left wheelwheel_right = robot.getDevice("right wheel motor") # Create an object to control the right wheel#[left wheel speed, right wheel speed]speeds = [max_velocity,max_velocity]
#include<webots/Robot.hpp>#include<webots/Motor.hpp>#include<webots/DistanceSensor.hpp>#include<webots/Camera.hpp>#include<webots/Emitter.hpp>#include<webots/GPS.hpp>#include<opencv2/opencv.hpp>#include<vector>usingnamespace webots;
usingnamespace cv;
usingnamespace std;
Robot *robot =new Robot();
int timeStep = (int)robot->getBasicTimeStep(); // Set the time step for the simulation
float max_velocity =6.27; // Set a maximum velocity time constant
Motor *wheel_left = robot->getMotor("left wheel motor"); // Create an object to control the left wheel
Motor *wheel_right = robot->getMotor("right wheel motor"); // Create an object to control the right wheel
DistanceSensor *leftDist, *frontDist, *rightDist; // Objects for left, front, and right distance sensor
Camera *cam; // Create an object to control the camera
Camera *colorSensor; // Color sensor is a 1 pixel camera
Emitter *emitter; // Used to send messages to supervisor (report victims/hazards)
GPS *gps;
// [left wheel speed, right wheel speed]
float speeds[2] = { max_velocity, max_velocity };
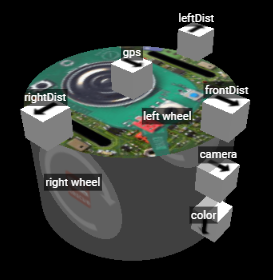
In the next step of the program, we initialize our distance sensors, camera, color sensor, emitter, and GPS. Remember that you can customize your own robot here. Here is the layout for our sample robot:
Three distance sensors facing left, forward, and right
One forward facing camera for victim and hazard detection
One downward facing color sensor to detect black pits
One GPS for the robot’s position when reporting victims and hazards
An emitter for reporting victims and hazards (not in diagram, on robot by default)
//Inside of main
leftDist = robot->getDistanceSensor("leftDist");    // Grab robot's left distance sensor
leftDist->enable(timeStep);     // Enable the distance sensor

frontDist = robot->getDistanceSensor("frontDist");
frontDist->enable(timeStep);

rightDist = robot->getDistanceSensor("rightDist");
rightDist->enable(timeStep);

cam = robot->getCamera("camera");
cam->enable(timeStep);

colorSensor = robot->getCamera("color");
colorSensor->enable(timeStep);

emitter = robot->getEmitter("emitter");     // Emitter doesn't need enable

gps = robot->getGPS("gps");
gps->enable(timeStep);
Next, we set the ‘position’, we set this to be infinite, as this allows the wheels to turn infinitely, they are not limited by turning a certain amount.
//Inside main
wheel_left->setPosition(INFINITY);
wheel_right->setPosition(INFINITY);
We setup some functions which we can then call to set the movement of the robot. In each of these we set the speed of the left and right wheel using the speeds list. We also define a delay function for prolonged movements and a getColor function to retrieve the brightness level seen by the color sensor (grayscaled value from 0 (black) to 255 (white)).
defturn_right():
#set left wheel speed speeds[0] =0.6* max_velocity
#set right wheel speed speeds[1] =-0.2* max_velocity
defturn_left():
#set left wheel speed speeds[0] =-0.2* max_velocity
#set right wheel speed speeds[1] =0.6* max_velocity
defspin():
#set left wheel speed speeds[0] =0.6* max_velocity
#set right wheel speed speeds[1] =-0.6* max_velocity
defdelay(ms):
initTime = robot.getTime() # Store starting time (in seconds)while robot.step(timeStep) !=-1:
if (robot.getTime() - initTime) *1000.0> ms: # If time elapsed (converted into ms) is greater than value passed inbreakdefgetColor():
img = colorSensor.getImage() # Grab color sensor camera's image viewreturn colorSensor.imageGetGray(img, colorSensor.getWidth(), 0, 0) # Return grayness of the only pixel (0-255)
voidturn_right() {
// set left wheel speed
speeds[0] =0.6* max_velocity;
// set right wheel speed
speeds[1] =-0.2* max_velocity;
}
voidturn_left() {
// set left wheel speed
speeds[0] =-0.2* max_velocity;
// set right wheel speed
speeds[1] =0.6* max_velocity;
}
voidspin() {
// set left wheel speed
speeds[0] =0.6* max_velocity;
// set right wheel speed
speeds[1] =-0.6* max_velocity;
}
voiddelay(int ms) {
float initTime = robot->getTime(); // Store starting time (in seconds)
while (robot->step(timeStep) !=-1) {
if ((robot->getTime() - initTime) *1000.0> ms) { // If time elapsed (converted into ms) is greater than value passed in
return;
}
}
}
intgetColor() {
constunsignedchar* image = colorSensor->getImage(); // Grab color sensor camera's image view
return colorSensor->imageGetGray(image, colorSensor->getWidth(), 0, 0); // Return grayness of the only pixel (0-255)
}
We also create a several functions to help detect victims and hazards. The first function accepts a camera image and returns true if it detects a victim or hazard. It searches for contours (a contiguous shape within the image) whose area and width to height ratio fit within a certain range. Note that this function is by no means the optimal solution: it is prone to misdetections, can miss victims, and cannot differentiate between different letters and hazards - it is meant as an introduction into victim detection for you to improve upon.
After retrieving the image from the camera sensor, this function uses OpenCV to scan for victims. OpenCV for C++ can be difficult to install, and OpenCV in it of itself can be difficult to learn. Thus, if you feel a different method of victim detection will suffice, by all means comment out this function and implement your own solution. Do note, however, that the best solution essentially requires OpenCV or some other image processing library and that the internet has many useful resources for learning OpenCV.
1
2
3
4
5
6
7
8
9
10
11
12
13
defcheckVic(img):
img = np.frombuffer(img, np.uint8).reshape((cam.getHeight(), cam.getWidth(), 4)) # Convert img to RGBA format (for OpenCV) img = cv.cvtColor(img, cv.COLOR_BGR2GRAY) # Grayscale image img, thresh = cv.threshold(img, 80, 255, cv.THRESH_BINARY_INV) # Inverse threshold image (0-80 -> white; 80-255 -> black) contours, hierarchy = cv.findContours(thresh, cv.RETR_TREE, cv.CHAIN_APPROX_SIMPLE) # Find all shapes within thresholded imagefor cnt in contours:
x, y, w, h = cv.boundingRect(cnt) # Find width and height of contour contArea = cv.contourArea(cnt) # Area covered by the shape ratio = w / h # Calculate width to height ratio of contour# if the contour area and width to height ratio are within certain rangesif contArea >300and contArea <1000and ratio >0.65and ratio <0.95:
returnTruereturnFalse
1
2
3
4
5
6
7
8
9
10
11
12
13
14
15
16
17
18
19
boolcheckVic(void*img) {
Rect boundRect;
float contArea, ratio;
vector<vector<Point>> contours;
Mat frame(cam->getHeight(), cam->getWidth(), CV_8UC4, img); // Create frame using camera image
cvtColor(frame, frame, COLOR_BGR2GRAY); // Grayscale image
threshold(frame, frame, 80, 255, THRESH_BINARY_INV); // Inverse threshold image (0-80 -> white; 80-255 -> black)
findContours(frame, contours, RETR_TREE, CHAIN_APPROX_SIMPLE); // Find all shapes within thresholded image
for (int i =0; i < contours.size(); i++) {
boundRect = boundingRect(contours[i]); // Draw a rectnagle around shape for width to height ratio
contArea = fabs(contourArea(Mat(contours[i]))); // Area covered by the shape
ratio = (float)boundRect.width / boundRect.height; // Calculate width to height ratio
//if the contour area and width to height ratio are within certain ranges
if (contArea >300&& contArea <1000&& ratio >0.65&& ratio <0.95)
return true;
}
return false;
}
To receieve points for a victim or hazard detection, you must report its location and type to the supervisor. The following function accepts a character for the victim/hazard type and reports it to the supervisor.
 1
 2
 3
 4
 5
 6
 7
 8
 9
10
11
12
13
14
15
16
defreport(victimType):
# Struct package to be sent to supervisor to report victim/hazard# First four bytes store robot's x coordinate# Second four bytes store robot's z coordinate# Last byte stores type of victim# Victims: H, S, U, T# Hazards: F, P, C, O wheel_left.setVelocity(0) # Stop for 1 second wheel_right.setVelocity(0)
delay(1300)
victimType = bytes(victimType, "utf-8") # Convert victimType to character for struct.pack posX = int(gps.getValues()[0] *100) # Convert from cm to m posZ = int(gps.getValues()[2] *100)
message = struct.pack("i i c", posX, posZ, victimType)
emitter.send(message)
robot.step(timeStep)
 1
 2
 3
 4
 5
 6
 7
 8
 9
10
11
12
13
14
15
16
17
18
voidreport(char victimType) {
// Character array to be sent to the supervisor to report victim/hazard
// First four bytes store robot's x coordinate
// Second four bytes store robot's z coordinate
// Last byte stores type of victim
// Victims: H, S, U, T
// Hazards: F, P, C, O
wheel_left->setVelocity(0); // Stop for 1 second
wheel_right->setVelocity(0);
delay(1300);
char message[9];
int posX = gps->getValues()[0] *100, posZ = gps->getValues()[2] *100;
memcpy(&message[0], &posX, 4);
memcpy(&message[4], &posZ, 4);
message[8] = victimType;
emitter->send(message, 9);
robot->step(timeStep);
}
Here we have the main body of the program. First we setup a while loop that runs whilst the game is running (i.e. for the 8 minutes). It first checks for walls on the left, right, and front side, and turns away from any detected walls. It then uses the color sensor to check for a black pit, spinning away if detected. Lastly, it checks for a victim in view of the front camera and reports it anything it sees. Since the sample victim detection function is unable to differentiate between letters, it always reports ‘T’ for a thermal victim as a guess.
while robot.step(timeStep) !=-1:
speeds[0] = max_velocity
speeds[1] = max_velocity
# Check left and right sensor to avoid walls# for sensor on the left, eitherif leftDist.getValue() <0.05:
turn_right() # We see a wall on the left, so turn right away from the wallif rightDist.getValue() <0.05: # for sensor on the right too turn_left()
# for front sensorif frontDist.getValue() <0.05:
spin()
# if on black, turn awayif getColor() <80:
spin()
wheel_left.setVelocity(speeds[0])
wheel_right.setVelocity(speeds[1])
delay(600)
# if sees victim, report itif checkVic(cam.getImage()):
report('T') # Cannot determine type of victim, so always try 'T' for now wheel_left.setVelocity(speeds[0]) # Send the speed values we have choosen to the robot wheel_right.setVelocity(speeds[1])
intmain() {
while (robot->step(timeStep) !=-1) {
speeds[0] = max_velocity;
speeds[1] = max_velocity;
// Check left and right sensor to avoid walls
//for sensor on the left, either
if (leftDist->getValue() <0.05)
turn_right(); // We see a wall on the left, so turn right away from the wall
if (rightDist->getValue() <0.05) // for sensor on the right too
turn_left();
// for front sensor
if (frontDist->getValue() <0.05)
spin();
// if on black, turn away
if (getColor() <80) {
spin();
wheel_left->setVelocity(speeds[0]);
wheel_right->setVelocity(speeds[1]);
delay(600);
}
// if sees victim, report it
if (checkVic((void*)cam->getImage()))
report('T'); // Cannot determine type of victim, so always try 'T' for now
wheel_left->setVelocity(speeds[0]); // Send the speed values we have choosen to the robot
wheel_right->setVelocity(speeds[1]);
};
}
That about concludes the sample program. Again, you can find the interrupted full programs here: C++ | Python. Note that this sample program is by no means an optimal solution, it is just meant to introduce you to working in the Webots environment in Rescue Maze. Good luck programming!